
EXERCISES
Pelvic stabilization exercises focus on strengthening and stabilizing the muscles around the pelvic region. These exercises often target the deep core muscles, including the transverse abdominis and pelvic floor muscles. Strengthening these muscles can enhance core stability and support the spine.
PELVIC STABILIZATION


WALL BENCH
Wall Bench strengthens the pelvis and encourages great posture. Place feet in front of knees, parallel, & hip width apart. Backs of hands are against the wall. Squeeze your shoulders back. Head is straight. Hold this position for 1 minute / 2 sets. Breathe!


UP DOG / DOWN DOG
Up Dog and Down Dog stretch and relax the entire spine and spinal cord. With the Up Dog, the tops of the feet rest on the ground and the chest opens as you press your upper body toward the ceiling. Be sure to relax the buttocks. With the Down Dog, you want to relax the heels to the ground, tighten the thighs and press the chest through the arms toward the floor. Hold each position for 1 minute, OR hold each position for 10 seconds allowing your body to flow from one position to the next. Do 5 sets.


UPPER SPINAL FLOOR TWIST
This stretch is essential for spinal health. Do it every day. Begin on your side, with your hips and legs bent at 90 degree angles. Slowly rotate the chest and arm open, allowing the rib cage to stretch open. Do not allow the hips to roll open. Feel as if you are going to touch the back of your top shoulder blade to the ground. Keep the top arm in line with the chest. Breathe in and on each exhale feel the rib cage open up even more. Hold this position on each side for 1 minute. TIP: if you need help keeping the hips from rolling open, place your back against a door jam to block the hip movement.


CAT / COW
This stretch brings the flexibility back into the spine, speeds the healing of discs and joints, and relaxes tight muscles. Be sure to exhale when you look down (cat), pulling the tail bone and the forehead together. Inhale when you look up (cow), allowing the shoulder blades to squeeze together as the chest drops through to the floor and the tail bone points to the ceiling. Keep the arms straight. Repeat each position 10 times, flowing from one position to the next with a smooth motion and easy breaths.

HIP LIFT
The hip lift helps to strengthen and stretch the entire pelvis. For a more dynamic exercise do not hold the leg with the hands. Push the knee of the crossed leg away from you, and a pull the knee of the bent leg (not crossed) toward you. There is no motion in this stretch. Just the push - pull - hold. Do not use your arms to pull. Relax the neck. Hold this position for 1 minute on each side. You may feel completely different on each side, that is a sign that you really need this stretch.


HIP STRETCH
This is a great stretch for opening the hips and pelvis. Just let the crossed leg drop toward the floor at your side, then let the knee fall toward the floor, stretching the front of the hip. Hold for one minute on each side.

LUNGE STRETCH
This is the most important stretch for the pelvis. It stretches the psoas muscle, a deep hip flexor which can cause many problems in the pelvis if it is not stretched properly. The key here is to push the hips forward, keep the arms straight and feel the chest stretching backward. You should feel this stretch all the way up to the rib cage. Hold this position for 15 seconds, repeat twice on each side.


BRIDGE
Bridging is the easiest way to create great pelvic stability. Contract the butt muscles and press your strong stomach toward the ceiling, creating a flat surface. Hold for 5 seconds. Do 2-3 sets of 12. Progression: straighten one leg so that it stays parallel to the bent leg and try one legged bridging. When that gets too easy, try two-legged bridging on a physio ball, then one leg on the physio ball.

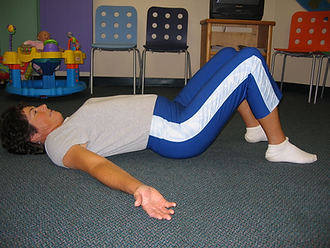
PELVIC TILT (FLATTENED) PELVIC TILT (ARCHED)
This is extremely important your low back range of motion. It will help discs and joints heal more quickly and can reduce low back pain very effectively. Lie on your back with your knees bent, feet hip width apart.
1. Flatten your low back to the floor by rolling your pelvis backward.
2. Then arch your low back by rolling your pelvis forward.
Reps: 12 Sets: 2-3

ONE LEG UP
This position will ensure that you are correcting the abnormal rotation of your pelvis. Place one leg up on a chair so the knee and hip are flexed to 90 degrees. Dr. Cherie recommends that you perform this exercise with either the right or the left leg up ONLY! Do not do this stretch on both sides. Hold this position for 10 minutes at the end of your routine, or at the beginning and end of each day.